From the earliest millennia in cultures across the globe, cave walls and cloth has been decorated by various forms of stencilling. It is both a simple and effective way of reproducing a shape and transferring it to a surface repeatedly. For this reason, it was also used in North American folk art on furniture, wall decoration and on art objects.
Traditional stencilling, however, does have limitations. Many will remember the simple card stock stencils of the letters of the alphabet used in primary school. Letters with enclosed shapes posed a special difficulty. A single stencil could not be used to draw the letter “O,” for instance, because the empty center of the letter needed be held in place. Instead, two half letters, each with half of the center space of an O were used. In this same way, traditional stencilling does not allow the artist to do whatever is wanted; the demands of the physical stencil must always be considered or the stencil will not hold together.
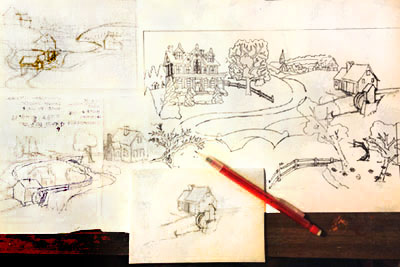
To acheive what A. Michael Shumate accomplishes in traditional stencilling requires much planning, development and refinement. Typically, each of the larger stencil designs took over 200 hours to produce the first successful print.
Here is his process in step-by-step order.
Design the Image
More than a pleasing image must be worked out. Planning which colors need to be used, what colors can be achieved by overlapping and in which order the colors are laid down must all be carefully thought out.
Finalize the Design
The final design, complete with color layer notations, is finalized on a paper master.
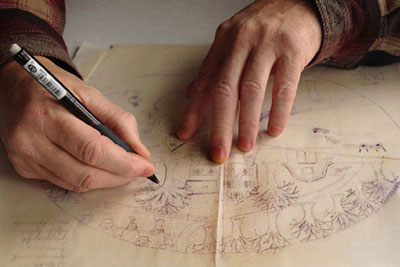
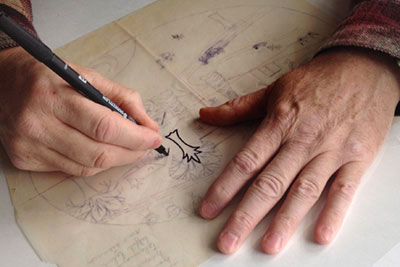
Transfer to Separate Stencils
Each color requires a separate stencil. The individual parts that pertain to a given stencil must each be carefully traced onto their respective mylar sheets. At this stage, various color issues or impractical stencil structure issues must be addressed, often requiring revising the paper design and starting over with all affected stencil mylar sheets. This stage can take a long time. When all of the stencil sheets are drawn, they must be laid on top of each other to assure proper registration of all image parts.
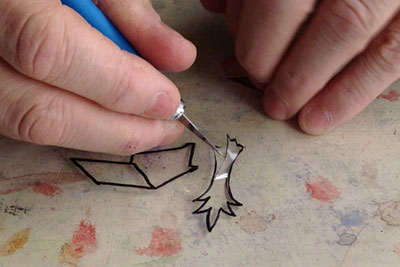
Cut the Stencils
Each shape in each stencil must now be cut out with a razor knife. This is exacting work. For instance, in the large print titled “City Street,” cutting just the stencil for bricks in the center building took eight full hours. Each “brick” had to be cut without slipping and cutting through the mylar where the “mortar” had to remain unpainted when stencilled.
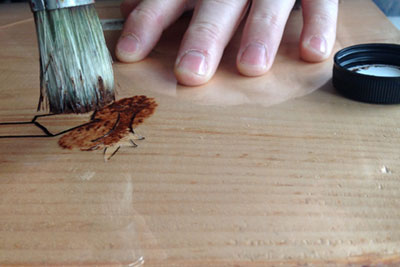
Paint Through the Stencil
Stencil paint is thick and stencil brushes are stiff and flat ended. The proper amount of paint is dabbed through the open areas in each stencil.
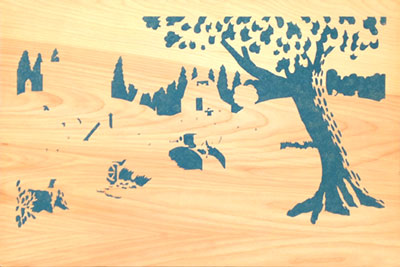
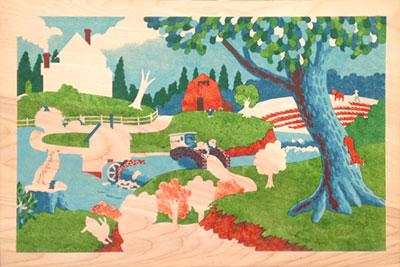
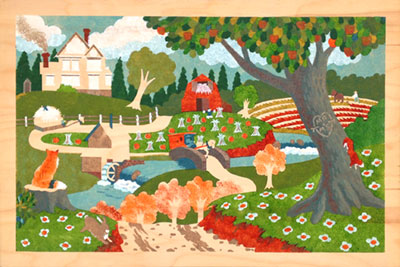
Step 1 for “The Fox’s View”
Now we will see the build-up of a complete image, stencil by stencil, paint layer by layer. The first color in this image is Revere Blue, a darkish, muted shade, which is stencilled directly onto the birch veneer plywood as the first of ten colors to make up this print. It will be under a green in the background trees and in several other key places.
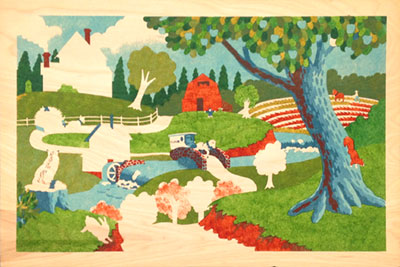
Step 2 for “The Fox’s View”
Country Blue, a lighter blue is stencilled next, in some places over the first blue, producing a middle value blue. Only two colors have been stencilled but three colors are visible already.
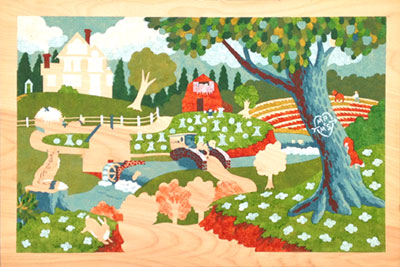
Step 3 for “The Fox’s View”
Barn Red is the next color. Where it is applied over the dark blue, it makes a warm dark brown; over the light blue, a warm middle brown is produced. Three colors stencilled but six colors visible. Note that in the trees in the mid foreground the color has been laid down in a feathered manner instead of solid. This will show up as variagated foliage in trees later on.
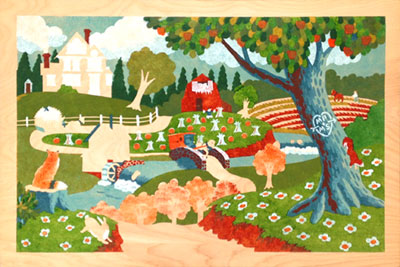
Step 4 for “The Fox’s View”
A cheery green is the next color. Where it is applied over the spruce trees in the background, previously painted the darker blue, it becomes a cool dark green. Where it goes over some light blue, as in the bushes in the middle right hand side of the image, it becomes a cooler middle green.
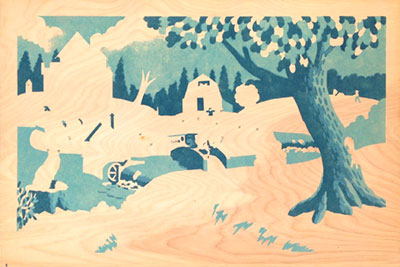
Step 5 for “The Fox’s View”
Yellow-green is the next color. It shows by itself on some leaves in the foreground tree and goes over other greens to enrich them.
Step 6 for “The Fox’s View”
One can’t keep specific separate shapes unpainted in the middle of a painted area in a stencil because there is nothing to hold these “no paint” areas in place. Here, the white is used on top of large green fields to make a base for new elements that need to show up later. It also makes clouds and window frames on the house.
Step 7 for “The Fox’s View”
Red-orange is the next color, put on in a feathered, soft-edged way on the fox’s back and in the trees in the mid foreground. It also goes over some light blue spots in the main tree to give some muted red apples.
Step 8 for “The Fox’s View”
A warm gray is laid down. In the tree trunk, it goes over the three colors that are already there to unify it and give it a more natural color. It does the same on the stone bridge. It is used in several other areas as well.
Step 9 for “The Fox’s View”
Yellow goes down by itself in the house at back, over the white grain sheaves in the middle field and on the flowers in the foreground, as well as over the tree foliage in the mid foreground. The fox looks more complete with yellow on top of the feathered red-orange as do the trees in the middle ground.
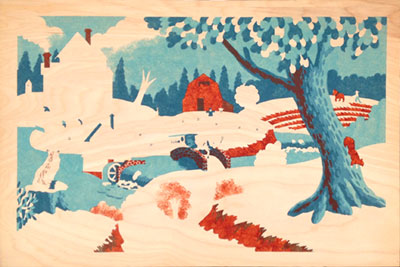
Step 10 for “The Fox’s View”
The last color, a dark brown, helps bring several details and finishing touches to multiple objects in our image, which is now finished.
The completed print is numbered and signed. The print is framed and ready for hanging.